
注意,以上代码需要使用 Firefox 3.5 来查看,在
Firefox 3.0.x 中,Canvas 的 Context 对象不支持 fillText 方法,而我安装的 Chrome 2.0.174.0 对
translate 方法的实现有误。
2. Canvas 中的渐变
WHATWG 的 Canvas
规范中规划了两种渐变模式,一种是线性渐变,另一种是径向渐变。如果需要在 Canvas
中使用渐变,首先要根据你所要创建的渐变模式来调用 Context 的相应方法来创建一个渐变对象,这个对象就是用来控制渐变的效果。
2.1
线性渐变
线性渐变使用 Canvas Context 的 createLinearGradient
方法创建,它的定义如下:
CanvasGradient createLinearGradient(in float x0, in float y0,
in float x1, in float y1);
通过 (x0, y0) 与 (x1, y1)
指定渐变的开始位置与截止位置。当然,创建完线性渐变对象并不能完全开始使用渐变对象,你需要给它指定渐变的起始色以及终止色。CanvasGradient 对象有一个
addColorStop 方法用来添加颜色。
gradient.addColorStop(offset,
color)
在线性渐变中,偏移量 offset 只能取 0 或 1,分别代表线性渐变的起始色和终止色。color
参数的值可以参考上面说明的颜色格式。
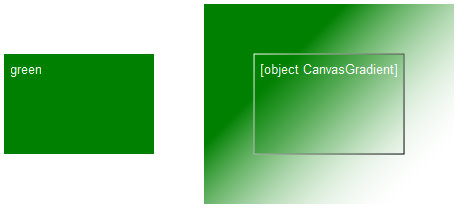
例如,我要创建一个从 (20, 20) 到 (150, 150)
的一个渐变,从绿色渐变到白色透明,就可以按照下面的代码来创建 CanvasGradient 对象:

var
canvas = document.getElementById("canvas");
var ctx =
canvas.getContext("2d");
// fill a rectangle whit sepecified fill
style
function fillRect(color, x, y, h, w) {
ctx.fillStyle =
color;
ctx.fillRect(x || 0, y || 0, h || 150, w || 100);
ctx.font = "10pt Arial";
ctx.fillStyle = "white";
ctx.fillText(color, 6, 20);
}
ctx.translate(0, 50);
//
fill rect with color name
fillRect("green");
//
从绿色渐变到白色完全透明,并指定给填充色
var gradient = ctx.createLinearGradient(20, 20, 150,
150);
gradient.addColorStop(0, 'green');
gradient.addColorStop(1,
'rgba(255,255,255,0)');
ctx.translate(250, 0);
fillRect(gradient,
-50, -50, 250, 200);
fillRect(gradient);
//
从白色到黑色的渐变,并指定给边框色
gradient = ctx.createLinearGradient(0, 0, 150,
100);
gradient.addColorStop(0, 'white');
gradient.addColorStop(1,
'black');
ctx.strokeStyle = gradient;
ctx.strokeRect(0, 0, 150,
100);
2.2 径向渐变
与线性的用法类似,它的函数签名如下:
CanvasGradient
createRadialGradient(in float x0, in float y0, in float r0, in float x1, in
float y1, in float
r1);
与线性渐变不同的是,径向渐变除了要指定起始位置和终止位置外,还需要指定起始半径和终止半径。使用不同中心点的径向渐变可以实现类似光照的效果,不过目前
Chrome 对不同中心点的径向渐变支持不好,在 Chrome 中只会使用第二个中心点进行径向渐变,测试发现在最新开发版 Chrome 3.0.184.0
(17842) 中仍是如此。
在下图中可以看到,主流支持 Canvas 的浏览器都能正确渲染中心点不同的径向渐变,而 Chrome
则只能使用第二个中心点进行渲染。
var canvas = document.getElementById("canvas");
var ctx =
fixContext(canvas.getContext("2d"));
// fill a rectangle whit sepecified
fill style
function fillRect(color, x, y, w, h) {
ctx.fillStyle = color;
ctx.fillRect(x || 0, y || 0, w || 150, h ||
100);
ctx.font = "10pt Arial";
ctx.fillStyle =
"white";
ctx.fillText(color, 6, 20);
}
ctx.translate(50, 50);
// 同中心,从绿色渐变到白色完全透明,并指定给填充色
var gradient =
ctx.createRadialGradient(50, 50, 0, 50, 50, 100);
gradient.addColorStop(0, 'white');
gradient.addColorStop(1,
'green');
fillRect(gradient, -50, -50, 300, 200);
//
第二次填充,矩形区域颜色加深
fillRect(gradient);
ctx.translate(250,
0);
// 不同中心,从绿色渐变到白色完全透明,并指定给填充色
var gradient =
ctx.createRadialGradient(0, 0, 10, 50, 50, 100);
gradient.addColorStop(0,
'white');
gradient.addColorStop(1, 'green');
fillRect(gradient,
-50, -50, 200, 200);
// 第二次填充,矩形区域颜色加深
fillRect(gradient);
小结
总的来说,Canvas
中的颜色使用与使用 CSS 进行颜色定义没有什么区别,但比较强大的是 Canvas 支持渐变,这样就可以通过 Canvas
来做一些比较炫的效果。
这篇拖的太久了,已经有些忘了,先结束掉这部分再继续写了……
